Instagram Shopping: Setup & Benefits Guide
Selling on social media platforms is a revolutionary way for online businesses to boost their sales and Instagram Shopping makes it easy for small and mid-sized businesses to connect with more customers.
If you’re already advertising on Instagram, setting up a shopping page streamlines the process for your customers. It provides an easy-to-access storefront where Instagram users can purchase your products without leaving the platform. This seamless shopping experience combined with increased visibility can greatly boost your sales.
In this guide, I’ll show you how to set up an Instagram shopping page using SmatBot. This will allow you to tap into Instagram’s ecosystem and grow your business revenue.
But before we dive in, let’s cover some basics.
What Is Instagram Shopping?
Instagram shopping is our new end-to-end e-commerce bot designed especially for Instagram. With this remarkable feature, businesses can effortlessly integrate and showcase their products, allowing users to seamlessly browse, analyse and make purchases—all directly on Instagram.
Isn’t that fantastic?
Moreover, we offer payment collection and immediate post-payment responses right within the Instagram platform. But hold on, there’s even more!
Our e-commerce bot also features a robust product categorisation system, ensuring a smooth and organized shopping experience for your users.
Top Use Cases of Instagram Shopping:
- Businesses can effortlessly showcase and sell their products and services directly on Instagram.
- Small and mid-sized businesses that don’t have their own e-commerce websites can leverage this feature to sell directly to active users.
- Online sellers seeking additional channels or platforms to boost sales can use Instagram Shopping.
- Businesses can launch new product collections to reach a wider audience and generate immediate sales.
- Businesses can expand their reach to an international audience without physical stores.
- Influencers and affiliate marketers can use this feature to resell third-party products.
- Influencers and affiliate marketers can take advantage of Instagram shopping to promote third-party products and services in an organized manner.
Benefits of Instagram Shopping:
- Instagram’s shopping feature provides a seamless in-app experience. This will boost conversions and sales.
- Marketers can create shoppable content based on their audience’s interests.
- Marketers and businesses can build authority by partnering with each other.
- Customers can easily discover and purchase their preferred products directly on Instagram, covering the gap between product browsing and shopping.
- Instagram Shopping enables businesses to reach global customers, access new markets and promote growth.
- Businesses can showcase their products to a wide audience of active users. This will increase their brand visibility and awareness.
How To Set Up Instagram Shopping For Your D2C E-Commerce Business?
Here, I am going to share a step-by-step guide on how to set up your Instagram shopping page with SmatBot:
Let’s begin.
Step 1: Create an account on SmatBot.
First, you have to create your account on Smatbot. For this, you can follow the steps shown in the video: Create an Account.
Step 2: Connect your Instagram business account to the SmatBot dashboard.
Next, you will need to connect your Instagram business account associated with a Facebook page to the SmatBot dashboard. For this follow the below-mentioned steps:
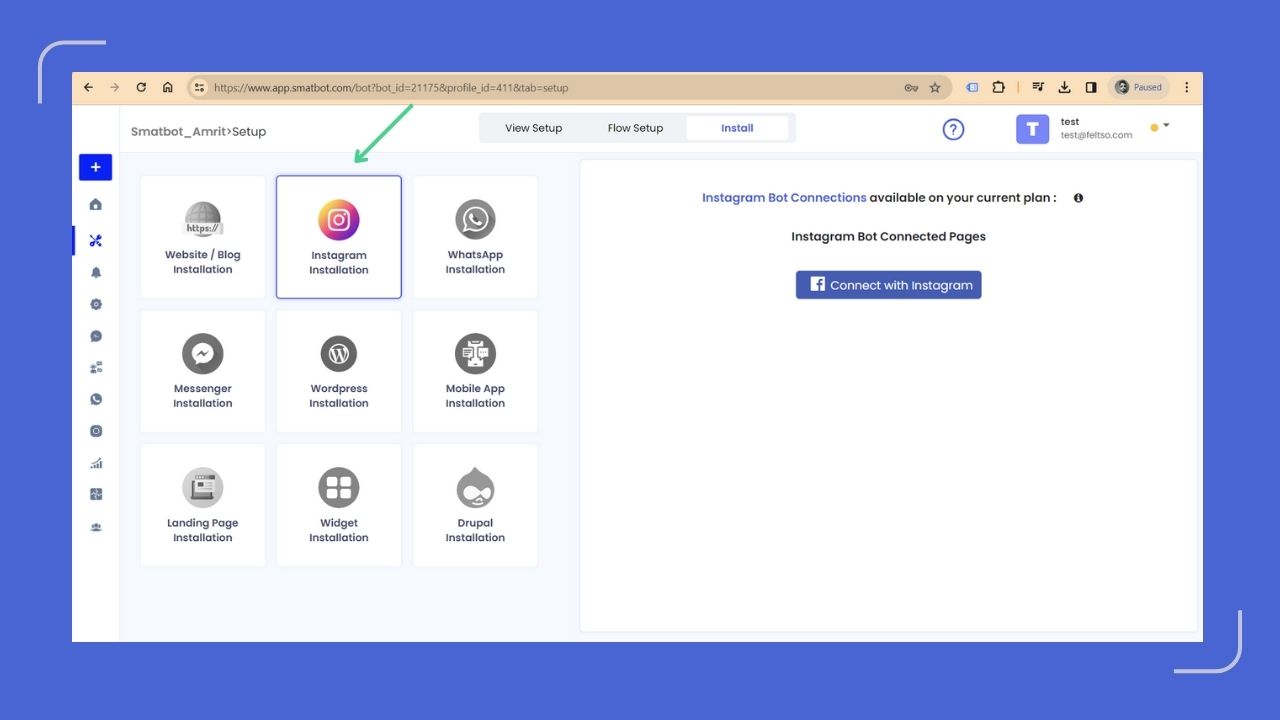
- Step 2a: Select the option “Instagram Installation” under the “Install” tab. (as shown in the image below).
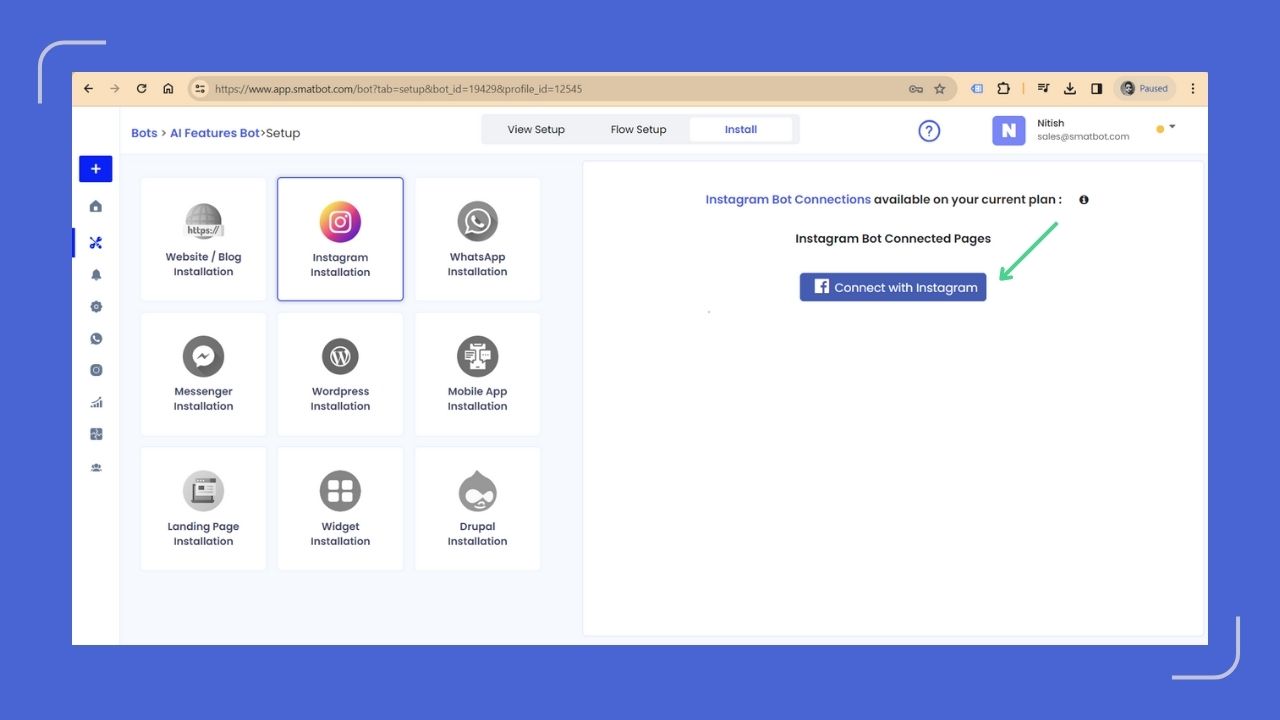
- Step 2b: Click on the “Connect with Instagram” button
- Step 2c: If you are already logged in and your Instagram account is connected to the same user ID, click on “Continue as [your user ID]”.
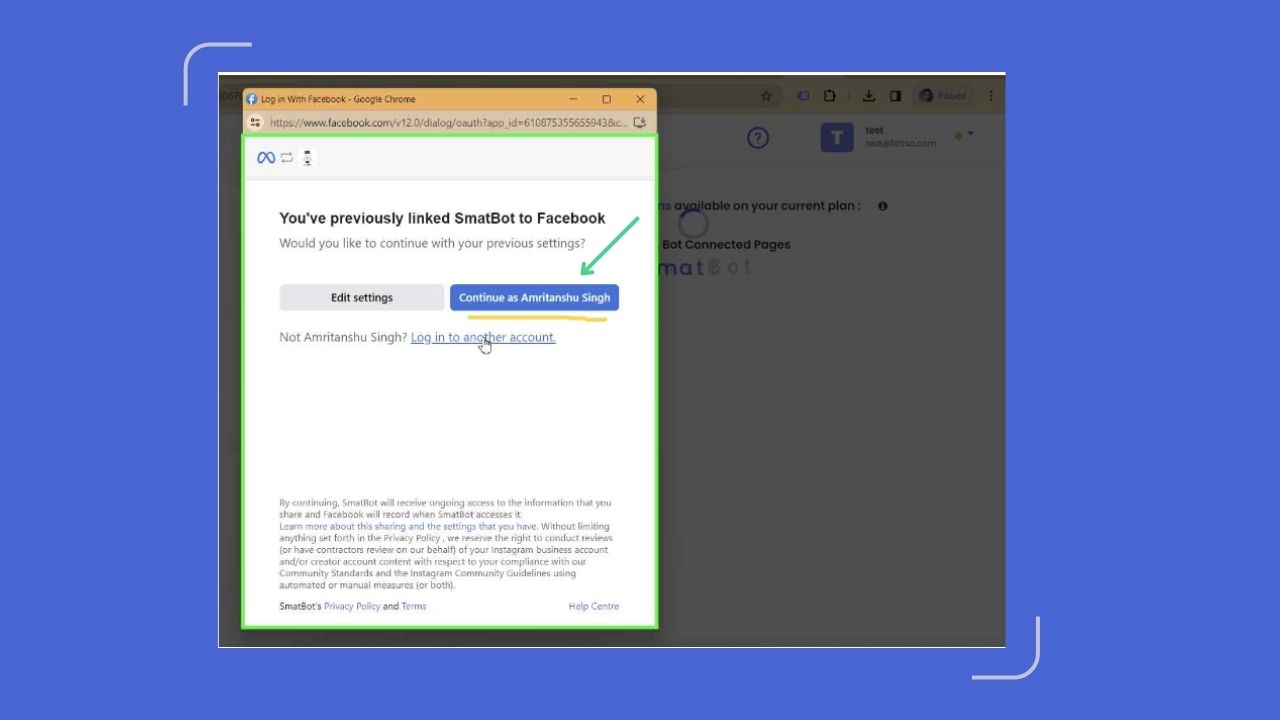
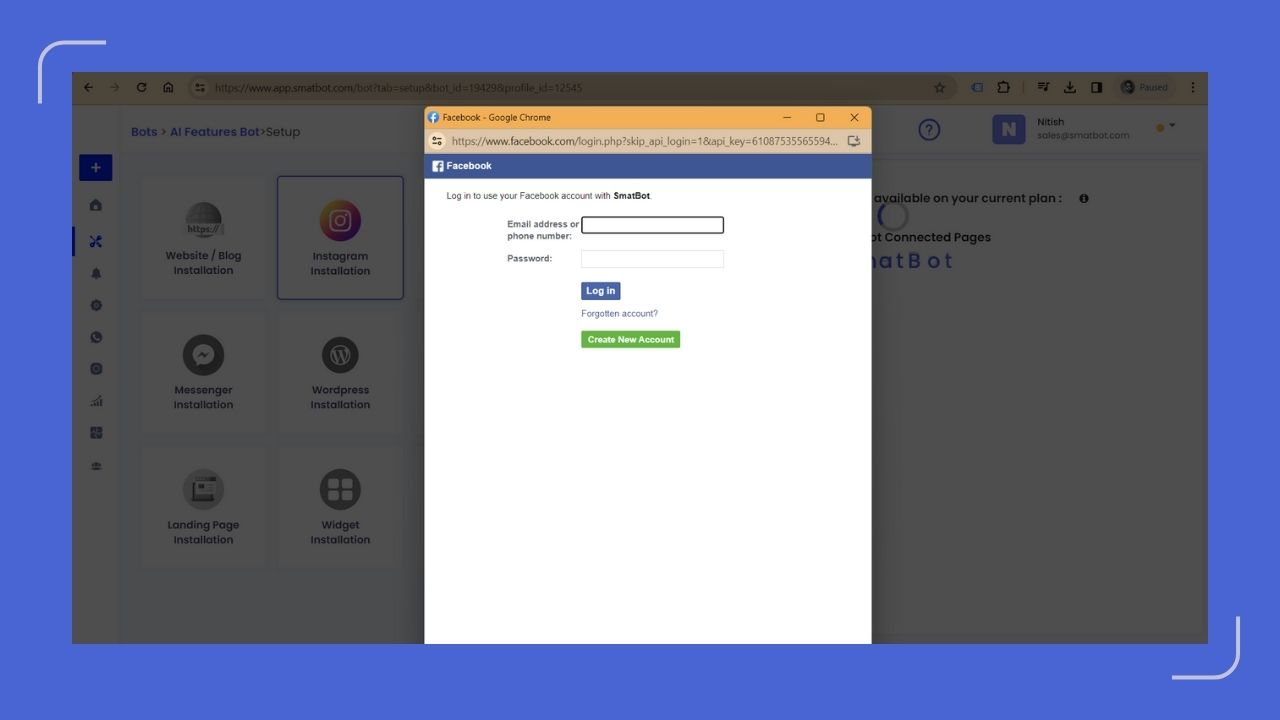
Otherwise, log in to the “Meta account” associated with your “Instagram Business account”.
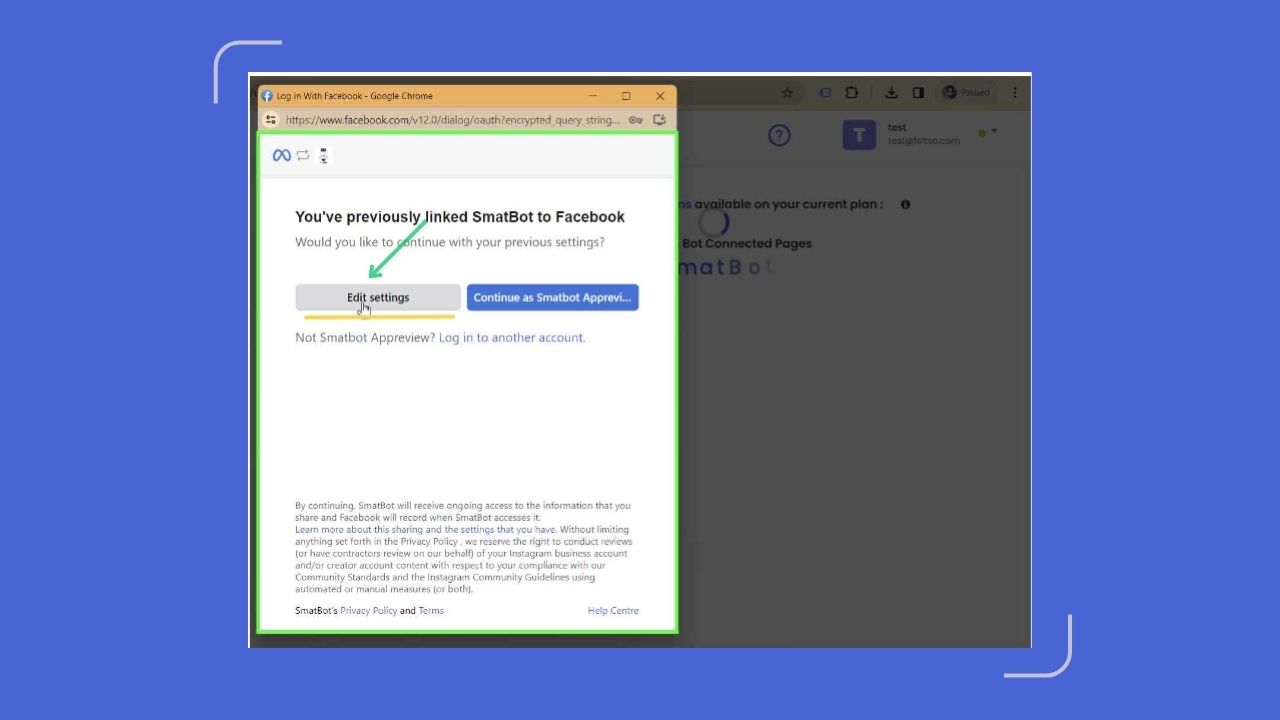
- Step 2d: Now, simply click on the “Edit settings” button. (as shown in the image below).
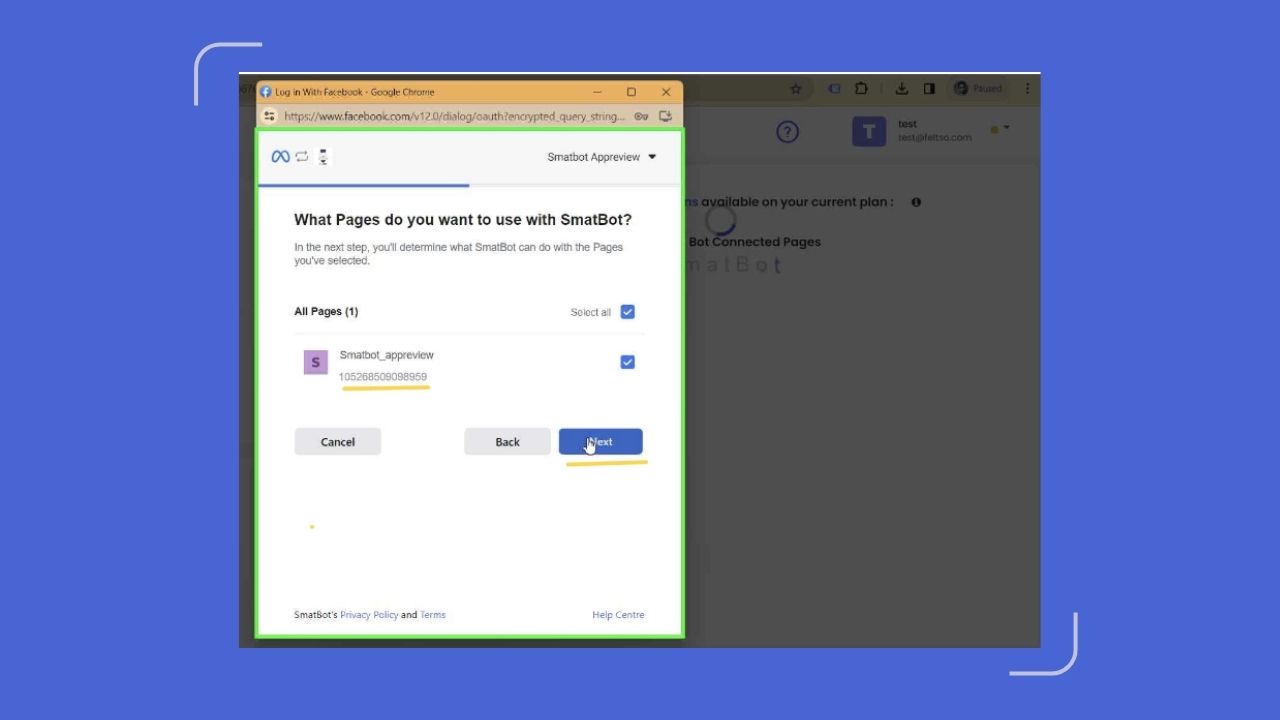
- Step 2e: Next, you can preview the “Instagram Account” which is connected to the ID and click on the “Next” button.
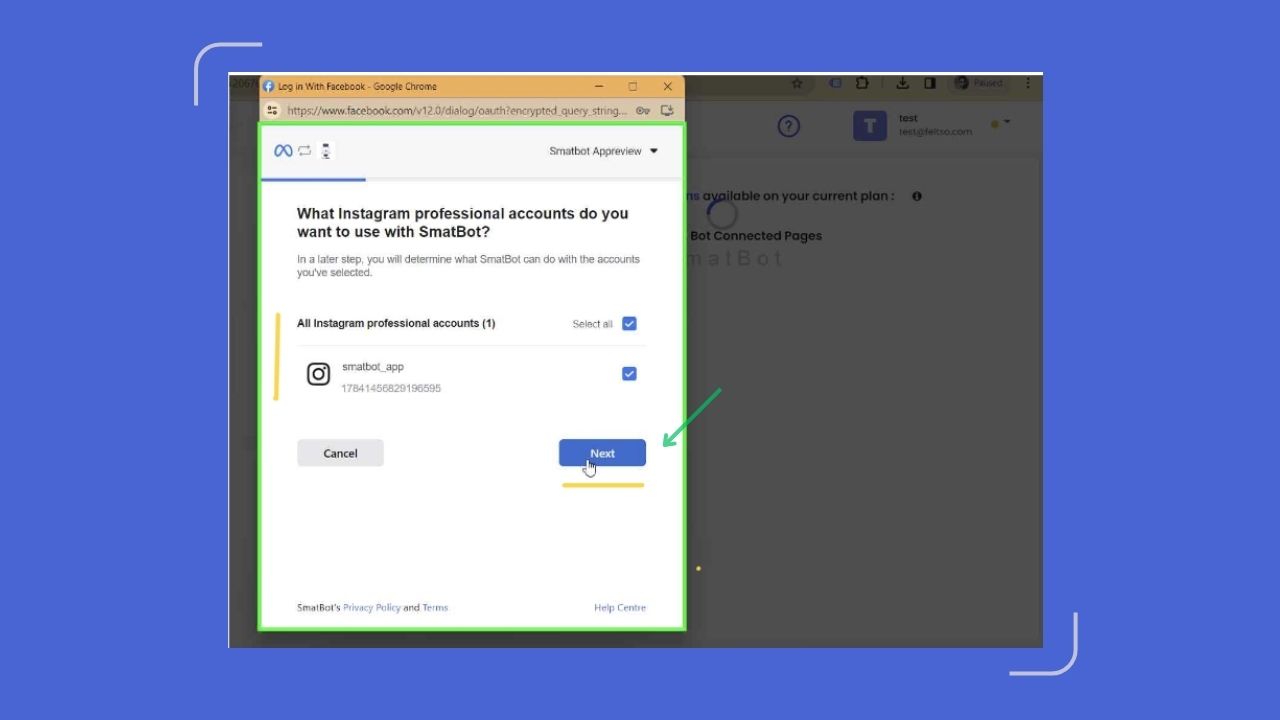
- Step 2f: If a business has multiple brand pages on Facebook, it can choose to select one specific account or multiple accounts.
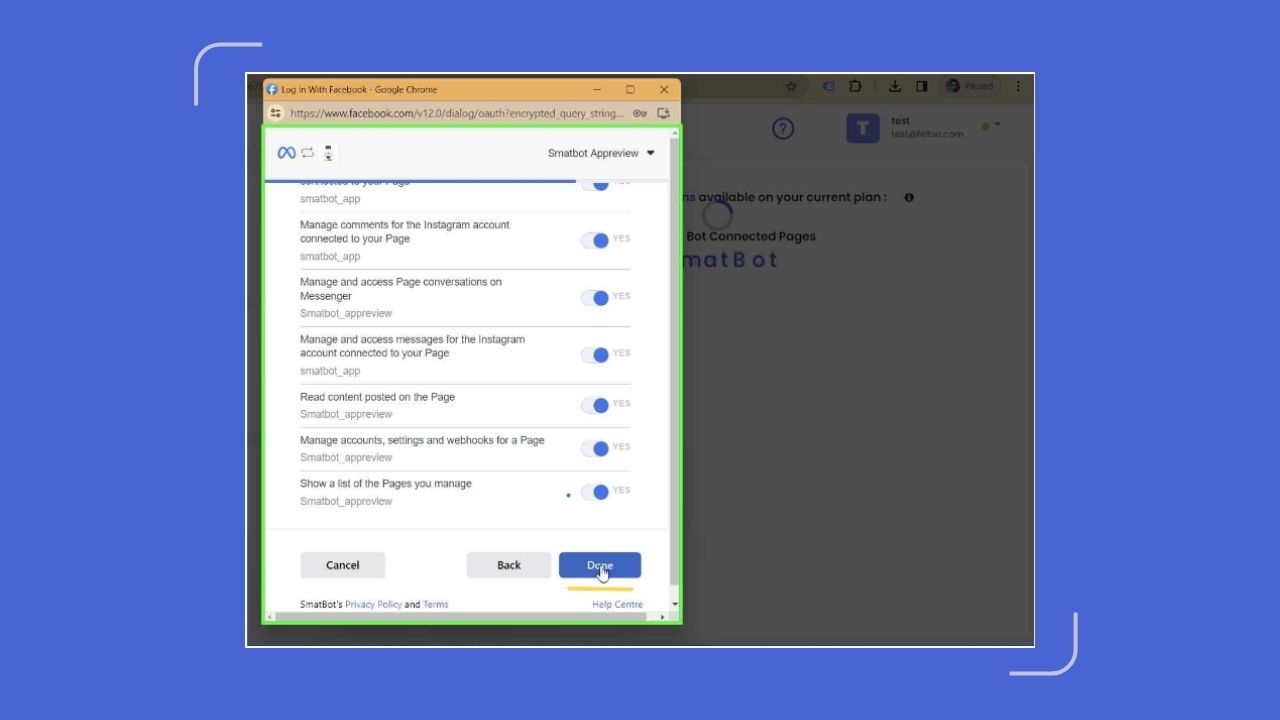
- Step 2g: In the next step, you will need to grant permission to “Manage” and “Access” all options by toggling the button to “YES”. Then, simply click on the “Done” button.
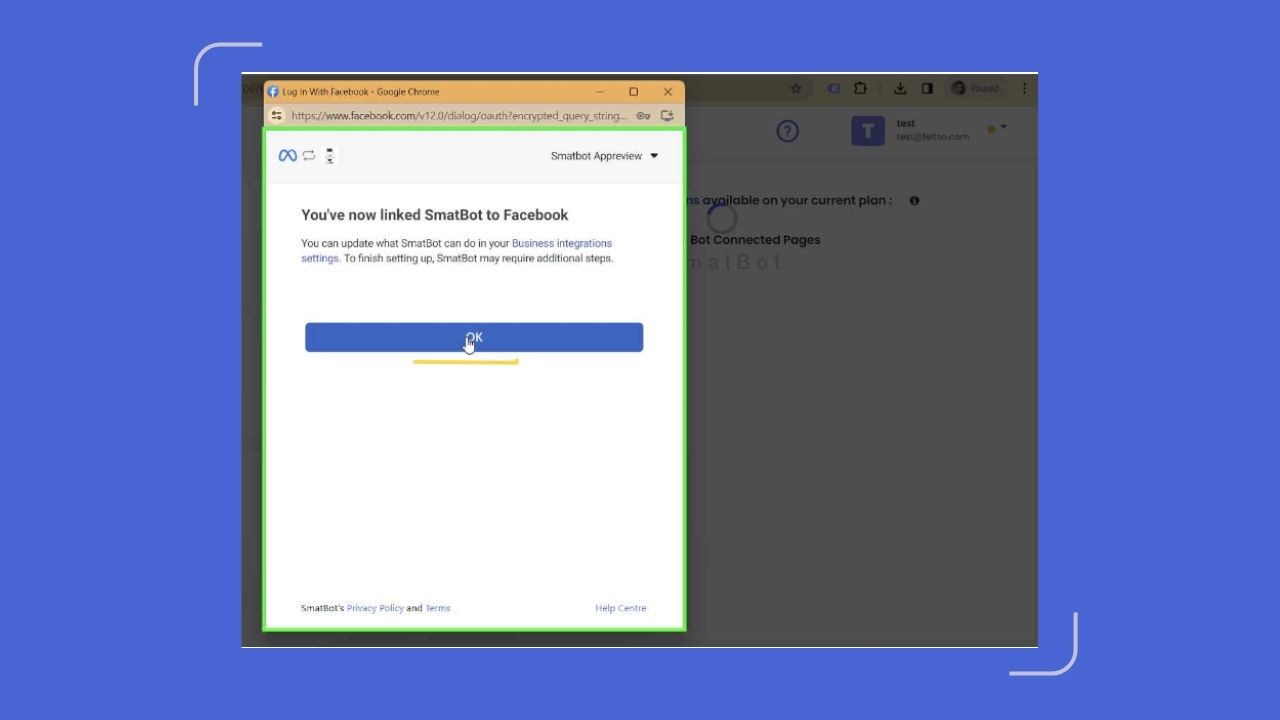
- Step 2h: The Smatbot dashboard is now linked to Facebook.
Step 3: Select Instagram Business Accounts
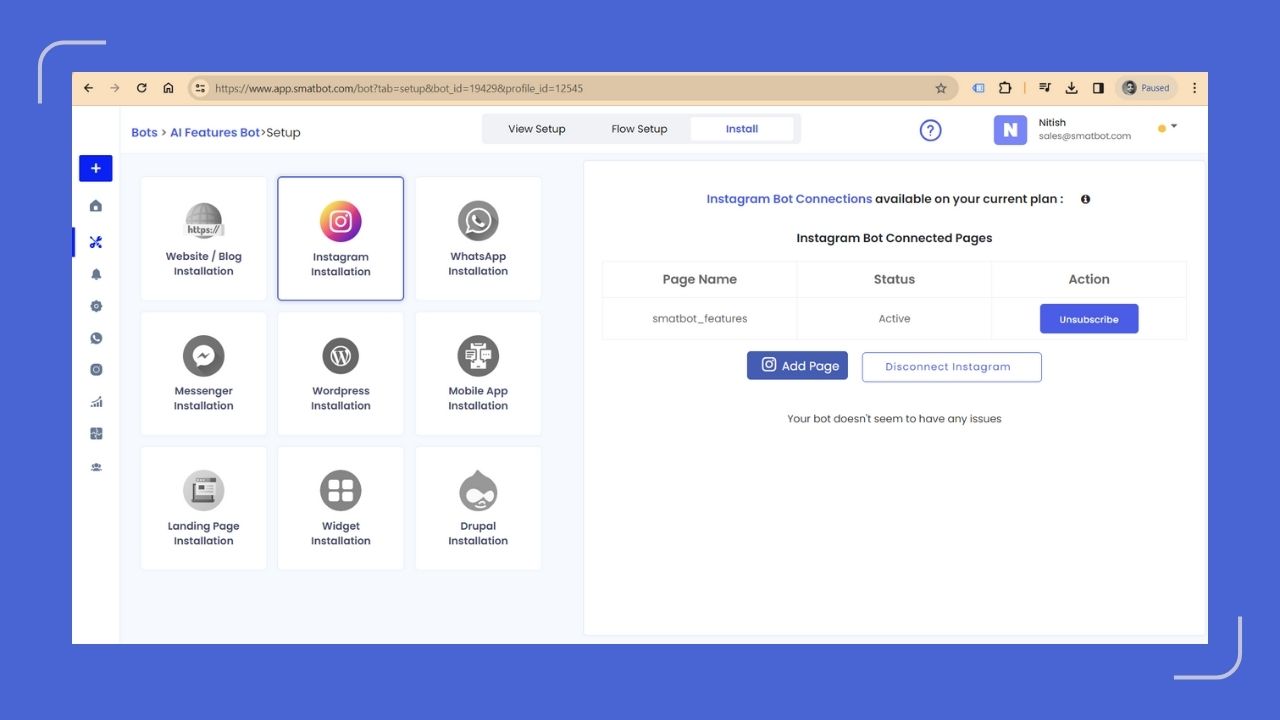
If there are multiple “Instagram Business Accounts”, select any one of them and click on the “Save” button.

Congratulations, your “Instagram Business Account” is successfully connected to Smatbot.
Step 4: Go to the ‘Flow Setup’ tab
Now, navigate to the ‘Flow Setup’ tab. Here, you will find various options, but you need to select the ‘Carousel with Buttons’ option (located at the bottom left).
Once the option is added, click ‘Edit Question’ (pencil icon).

Step 5: Select your Product Categories
To organise and showcase your product offerings effectively, you will need to choose your product categories and list individual items within them. You can include accessories, clothing, and more. Each category can have its own dedicated product cart and jump flow for easier navigation.

Step 6: Choose Order Items
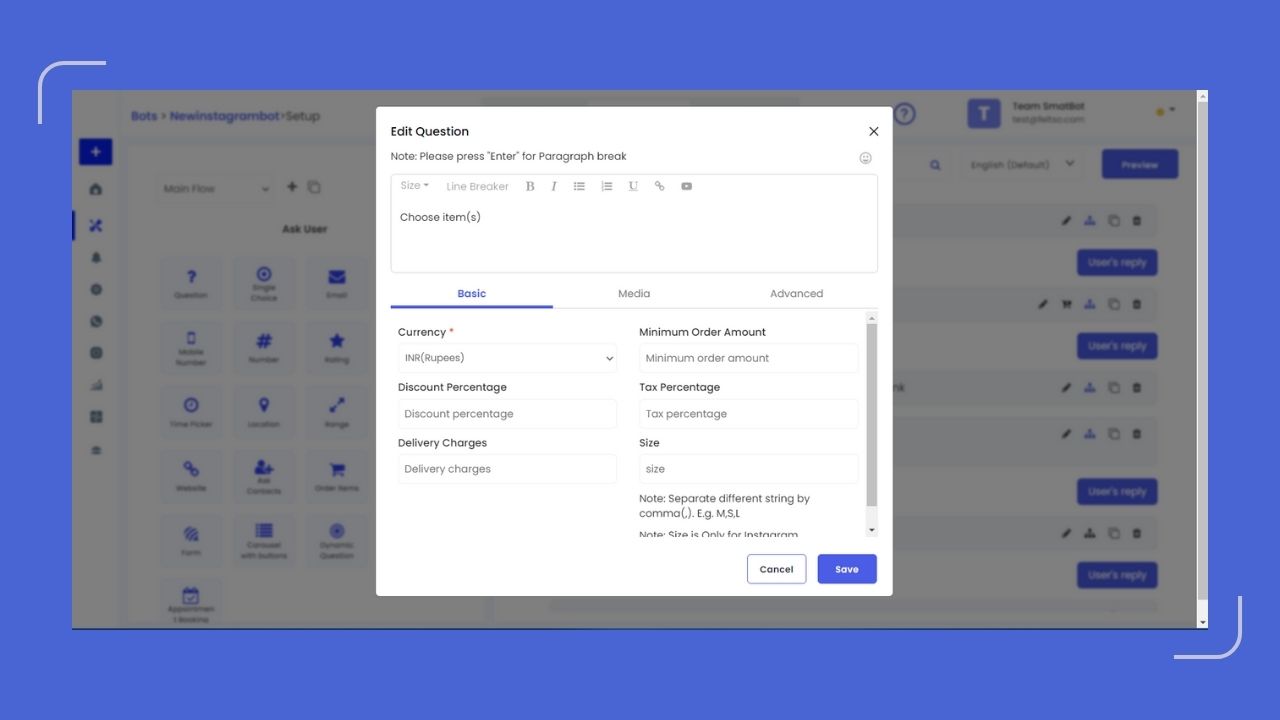
Next, select the option “Order Items” (located at the bottom left). Once the option is added, click on the “Pencil icon” to add products to the cart.

Step 7: Name your Product Flow
Now, name your product flow. For example, instead of saying “Add Products to Cart”. You can also mention “20% off on Men’s Shoes”.
After that, you will need to provide a few additional details as mentioned below:
- Choose the “Currency” specific to your country such as AED, INR, USD etc.
- Add the available sizes for your product. For example, shoes have numerical sizes (UK 7, UK 8, UK 8.5, UK 9, etc.).
- To save the changes, click on the “Save” button.
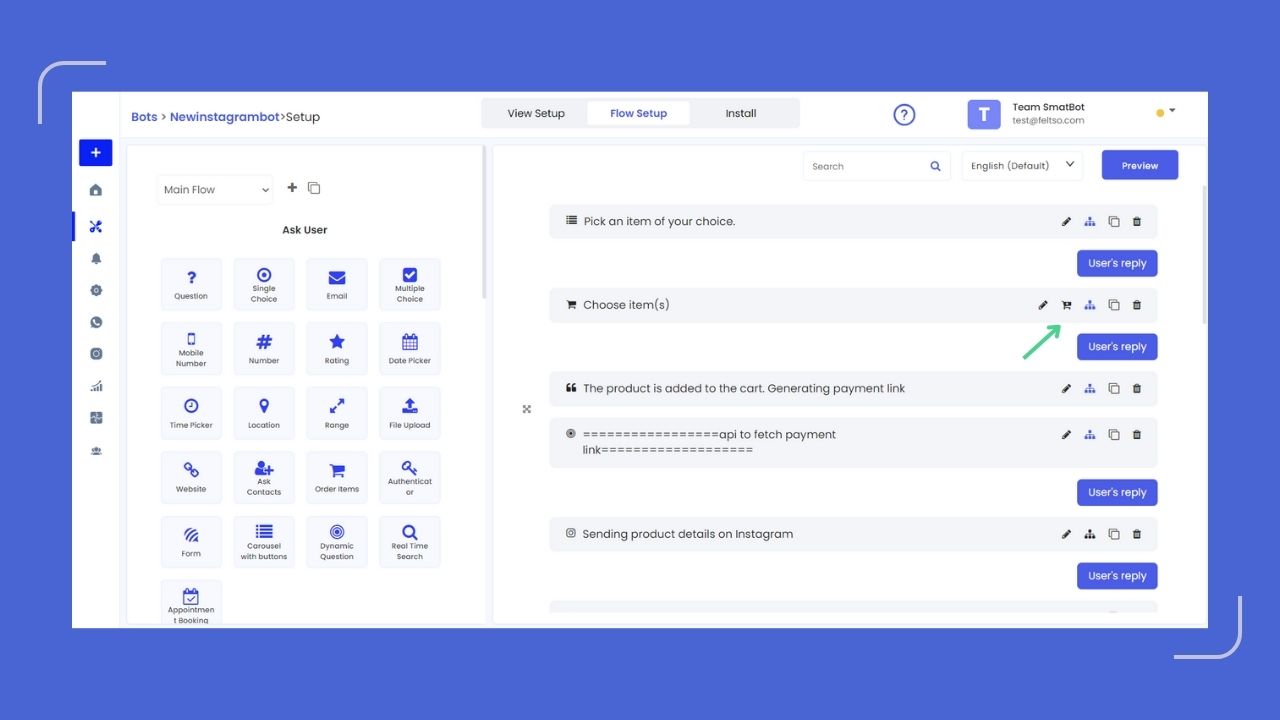
Step 8: Click Cart Option
Click on the “cart” icon to “add item” for display.
Step 9: Add Products
Add the products that are relevant to the category. For example, for footwear, you can add shoes and slippers.
Then, provide product details such as product name and price.
Note: The currency will be pre-set and cannot be changed from the cart. Add the “Unique Item ID”, this will be passed to the vendor to recognize which product has been purchased. Now click on the “Save” button.

Step 10: Add a Confirmation Message
Next, add a confirmation message to notify the user about the payment link generation.

Step 11: Payment Settings
Now, add a dynamic question to call the “payment API”. The payment page will open in a third-party app (e.g., Razorpay) and the payment will be collected there.

Voila! You have successfully set up your Instagram Shop using SmatBot. Now, enjoy your seamless shopping experience and start reaching more customers effortlessly.
Wrapping Up
With Instagram Shopping, you can connect with potential customers on the platform where they’re most active. This leads to improved visibility, conversions and profits.
So don’t waste any more time! Engage your potential customers on Instagram and turn them into sales with SmatBot. Our end-to-end e-commerce bot will work wonders for your sales.


